Saturday, December 31, 2011

Homemade Black Beans & Corn Bread

I love beans.  And they are so good for you.  They are so loaded with sodium though if they are from a can. I do know that if you rinse them before you use them if they are from a can, that can reduce the sodium by almost half. 
 I put beans in my soups, on my salads, or even alone as a side dish. 
Since I've been on vacation from school, I've had extra time.  I made some amazing homemade black beans.
1 bag black beans
3 tbsp brown sugar
1 16 oz jar sweet salsa
1 tbsp dill
1 tsp salt
1 clove minced garlic
8 cups of water
1/2 package of turkey bacon (about 10 slices)
Soak your beans overnight according to the directions on the bag.  There is a faster method of preparing beans in a shorter amount of time.  Although I have never tried it.  The quicker method says to rapidly boil the beans for 30 minutes and then drain the water.
After soaking and rinsing your beans over night put on the stove with the 8 cups of water.  Bring to a boil and turn down heat to low.  Beans will take about two hours on a low boil.  These beans take awhile, but they are oh so worth it.  After the beans are have been boiling and are tender add the garlic, dill, brown sugar and the salt.  At this point most of your water will have been absorbed or boiled out.  Cut the bacon, not cooked, in think chunky slices.  Add bacon, raw, to the beans.  Continue cooking beans on low for an additional 30 minutes.  If beans have lost too much water add another 1/2 cup at a time.  You do not want your beans runny.  Cooking another 30 minutes on low with cook the bacon and add some wonderful flavor.  I might have use regular bacon, but that's not what I had on hand.  I rarely ever eat regular bacon anymore.
For the Corn Bread
Make the corn bread according to directions on package.  Add 1 tsp of dill, some salt and pepper and 1/2 cup of light sour cream.  The sour cream will make your muffins so moist.  They're delish.
For the Veggie Salad
1 avocado
1 cup frozen corn (no sodium added)
2 medium tomatoes
1 tsp dill
1 tbsp olive oil
1 tbsp balsamic vinegar
Add all ingredients to a large bag and shake to evenly coat.
For directions on cooking the pork go here.

Enjoy...

Kate Anne

Wednesday, December 28, 2011

Button Monogram "F"

I saw this idea a few weeks ago on pinterest.
I have been collecting buttons for a very long time.  But I have never known what to do with them.
Do you know how many times I have done a Google search, "What to do with buttons?"
Many, many, many times.  But my search always come back with nothing.  Well, I should say nothing of interest to me...Until I was on pinterest and saw a picture that intrigued me.
The maker of a similar button monogram actually sews the buttons on fabric, I just hot glued mine.
It turned out great.  I got the frame with the matting at Goodwill for $2.38.  I already had the buttons, fabric and hot glue.  So this was a very cheap project.  Even if you had to buy the buttons, fabric and hot glue this would still be a project less than $10 or $12 dollars.
First I took the cardboard that came as backing of the frame.  Then I cut fabric about 1 inch larger than the cardboard.  Next I hot glued the fabric to the cardboard.  Next I went through all my buttons and found similar colors that would work nicely together.
I kept the matte on so I knew how big to make my "F".  Then I arranged my buttons before I hot glued them to be sure I was happy with the layout.  I designed my "F",  But you can find the letter you're looking for on line.  There are lots of sites that provide specific designs.
Be careful when gluing your buttons on to not put glue right in the center of you button.  Put only on sides so it does not run through the center holes in the button.  Next add it to the frame without the glass.
What do you think?  Didn't it turn out cute!?  I love it!!

Thursday, December 22, 2011

Stuffed Peppers

Wash and cut tops off of bell peppers.  To make pepper sit up correctly you may have to take a small portion off the bottom.
3-6 bell pepper any color
1 lb of ground turkey, hamburger or sausage
1 cup shredded cheese
1 can of corn
1/2 of a purple onion, diced
1 cup of white rice
1 tsp garlic salt
1 tsp cumin
1 tsp dill
1 tsp paprika
2 1/2 cups of water
 1 tbsp olive oil
1 small can of tomato sauce
Turn oven on to 375 degrees.
Add olive oil to skillet over medium heat.  Add rice to olive oil and brown.  Once browned, add 2 1/2 cups of water, cumin, garlic salt, dill and paprika.  Mix thoroughly.  Cover and stir occasionally until all water is absorbed and set aside.  Brown the meat with the onion diced.  On this recipe I actually thought I was setting out ground turkey, but ended up being sausage.  I turned out to be really tasty!  Once meat is browned, add rice mixture, corn (drained) and tomato sauce. 
Now stuff the peppers to the top and place in an oven safe baking dish with pam sprayed on the bottom.  I also added about 1/2 cup of water to the bottom of the dish to add some moisture.  Cook for 25 minutes.
Take out of oven and add some shredded cheese to top and place back in oven for an additional 5 minutes.
Enjoy!!

Happy Birthday Jesus

My sweet boy has been singing this Christmas tune since last year.  A younger girl sang this song at our church last year and it's been stuck in his head ever since.  We just finally caught it on tape.
I love the innocence of children.

DIY Coasters

These are the latest rave on the Internet of DIY projects. They are all over.  Do you need to spice up your coffee table life?  Ha ha.  For these darling coasters you'll need:
4-6 ceramic tiles
A few pages of scrap booking paper or even neat cards
Modge podge (I'll tell you how to make your own)
Elmers glue
Scissors
Polyurethane
Paint brush
1 sheet of felt
Take whatever size tile you have an measure the paper a tad bit smaller than the tile.  If you don't have modge podge you can easily make your own.  Take your elmers glue and add water to it until it becomes the consistency of honey.  Next paint on your glue to the back of you paper that you have measured for your tile.  Allow all tiles to dry before painting on the polyurethane.  Once the paper is dry use your paint brush and paint the polyurethane over the entire tile to waterproof them.  Once this step has been completed and has dried cut circles about the size of dimes and glue to the four corners of your coasters to protect your coffee table. 
These make great gifts.  Gather the tiles and tie with pretty ribbon and add a sweet note.
It would be a great idea to add family photos to personalize these.

Wednesday, December 21, 2011

Low-Fat Pumpkin Spice Cupcakes

My mom went to a friends house for dinner awhile back and raved about these cupcakes that her friend made.  These turned out amazing and super moist.  Moms friend did not put any type of frosting on them but put mini chocolate chips.  I opted to make a homemade cinnamon frosting.  They were a bit messy but really good.
The spice cake mix called for 3 eggs 1/2 cup of oil and 1 1/2 cups of water, but I just added one egg, no oil and only 1/2 cup of water.  I am going to try next time to see how it turns out without any eggs.  You would not believe how moist these were.

For this recipe you'll need:
1 box spice cake mix
1 15 oz can of pureed pumpkin
1 egg
1/2 cup water
1 cup semi sweetened mini chocolate chips
If you'd like to keep this a low-fat recipe do not add frosting but add the semi sweetened chocolate chips.
Mix all ingredients in a large bowl.  Divide the batter into cupcake tins or a cake pan.  Bake according to the cake box.
For the frosting you'll need:
6 cups of powdered sugar
1/2 cup unsalted butter, softened to room temperature
2 tsp vanilla
1 tbsp cinnamon
Mix all ingredients together until smooth.  Top the cupcakes with the frosting and add coconut sprinkles to top if you like.

Sunday, December 18, 2011

Homemade Chili

What is better on a cold day in December than a hot bowl of homemade chili?  Not much!!
1 lb lean beef or ground turkey
3 tbsp homemade taco seasoning go here. (or package of store bought taco seasoning)
1 large green bell pepper chopped
1/2 purple onion finely diced
1 can of corn, drained
1 small cans of mushroom, or fresh
1 can black beans, drained & rinsed
1 can of dark kidney beans, drained & rinsed
2 cans diced tomatoes
3 cans of tomato sauce
Brown the meat and add the bell pepper and onion till tender.  Add the taco seasoning to the meat mixture and add 1 cup water and bring to boil.  Next add the remaining ingredients and leave it on low for about 30 minutes.  Serve with a dollop of sour cream and some cheddar cheese sprinkles.
It's delicious!

Saturday, December 17, 2011

Animal Print Nesting Boxes

I found these darling boxes a few weekends ago at the Salvation Army.  Yea, now I can do some more organizing.  Hummm....now what to organize?
They are wooden and they fit inside of each other.  I believe that someone hand painted them.
They are so cute and I only paid $2.95.
What a deal!!

Pretend Make-Up

I saw this a post months ago on how to make pretend make-up for little girls (or big girls if you don't like wearing make-up :) But I have a little boy and I'm sure his daddy would not approve of me making him pretend make up for Christmas.  It took me awhile to figure out who would like such a gift and then it hit me, my niece Kandra.  Sadly I don't see her often so she was not the first person I thought of but I hope
 she likes it. 
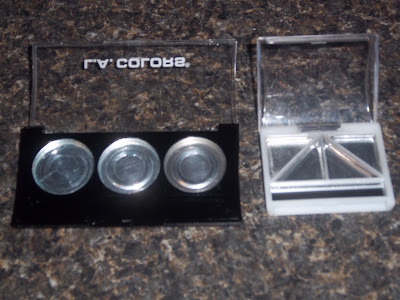
I went to the dollar store and bought three bottles of nail polish, two compacts of eye shadow, and a package of different sized brushes.
Next scrap out the eye shadow and rinse container with soap and water and dry thoroughly.
Now very slowly add the nail polish color of your choice to each little slot in the eye shadow container.  I held the brush of the nail polish over the opening while pouring so as not to let the ball from the polish fall out.
I allowed to dry over night.  And in the morning...viola!!!  A darling gift for that little lady in your life.
I picked up this darling Gap purse to hold all of the beautifying contents.
So this project cost me...
$3.00 for polishes
$2.00 for the eye shadows
$1.00 for the brushes
$1.38 for the little purse
Total $7.38.
Ideas came from here.

Saturday, December 3, 2011

Happy Anniversary

Happy Anniversary my love!  On Thursday, November 24th, Shawn and I celebrated our 9th year of marriage.  Can't wait to spend the rest of my life with you and continue to make sweet memories.
For our anniversary, we went to the Nutcracker today. 
It was amazing.  Then we went to Chillis for dinner.
Amazing day, with an amazing man!

Thursday, December 1, 2011

Pumpkin Cheesecake

What could be better than pumpkin flavored cheesecake?
Nothing!
My mom use to make this during the holidays.  This is a favorite in our house.
I borrowed this recipe from Mrs. Paula Deen.
For the recipe click here.
Amazing!

Homemade Pizza Pockets

Your husband getting tired of cold sandwiches for lunch?
These are a great alternative.
Pre-make them for the entire week and put them in the fridge to grab and go during the week.
You'll need:
1 roll of reduced fat croissants
2 cups shredded cheese
1/2 cup diced onion
1 diced bell pepper
1/2 package turkey pepperoni
1 cup spaghetti sauce
Set the temperature on the oven according to the directions on the croissants package.
Spray Pam in a pan and cook the onions and bell peppers until tender.
Open the croissants and press two of them together in a rectangle.  Add about a tbsp of spaghetti sauce.
Add 6 slices of pepperoni and a spoonful of onions and peppers.
Add 2 tbsp of shredded cheese.
Fold both sides together and pinch dough.
Put in oven and cook till golden brown.  About 15 or 20 minutes.
Take out and add a bit of cheese to the top and put back in the oven for an additional five minutes.
Put in individual baggies and eat cold or heat in microwave for 30 seconds.

Monday, November 21, 2011

Cranberry Cookies

Cranberry Cookies are a perfect little twist for your holiday treats!
These little babies were fantastic!!  I picked up a bag of fresh cranberries a week ago and have been looking for a recipe.  It seems like many of the recipes out there call for dried cranberries though and not fresh.
But I wanted to cook with fresh cranberries.
I stumbled across this recipe and figured I'd give it a try.  Boy, am I'm glad did.
For a little piece of your heaven click here.
I used real lemon and omitted the walnuts.
I was going to add white chocolate chips but realized I was out of them toward the end.
I will add them next time for sure.
I also only baked for 13 minutes.
These cookies have a bit of tartness and little sugar.  Perfect combination.  And the lemon ties it all together.
Delicious!  Too bad my hubby doesn't like cranberries, because I do not need to eat all of these cookies myself.

Friday, November 18, 2011

Tostadas

You need:
Tostada shells
1 lb lean beef
1 tbsp taco seasoning (recipe found here)
Shredded cheese
1 can black beans
1 can refried beans
tomatoes
Preheat oven to 350 degrees.  The tostada shells I use to not say to cook them but I warm them before topping them.  Cook the beef and then add the black beans, taco seasoning and about 1/2 cup of water.  Cook until all the water is absorbed.  When warming the refried beans I add about 2 tbsp of water to make the beans a little easier to spread on the tostada shell.
To top you shells spread the refried beans, beef mixture, cheese, lettuce and then you tomatoes.  You may top yours with sour cream or salsa.  Or you may add them amazing sauce that my mom use to make.  Click right here for the recipe.
Here are my boys enjoying some yumminess.

Taco Sauce

This is the sauce that my mom use to make to top tacos.  Yum.
1/4 cup fat free mayonnaise
3 tbsp salsa
1/2 tsp garlic salt
2 tbsp ketchup
Pepper
Mix all ingredients together.  Top burritos, tacos or your tostadas.  Yummy!

Boneless Pork Lions & Veggie Salad

For the pork loins...
2 tbsp flour
2 tbsp olive oil
1/4 cup Italian bread crumbs
1/2 tsp garlic salt
1/2 tsp dill
1/4 tsp cumin
Mix all ingredients in a bowl.  Warm up olive oil in a pan.  Swirl oil in pan to make sure it completely coats the bottom.  Completely coat pork loins in mixture.  Add to pan and cover with lid for about 7 minutes on the first side and 4 minutes for each additional side.  Cook until juices ran clear.
For the veggie salad...
3 small tomatoes
2 zucchini
1/2 small purple onion
1 clove diced garlic
2 tbsp olive oil
1/2 tsp dill
Salt & Pepper
Warm olive oil and add garlic.  Cook over medium for about a minute.  Add the onions and the zucchini and cook until tender.  The last minute or so of cooking add the tomatoes and dill.  Turn down the heat to low.  Salt and pepper salad to taste.

Saturday, November 12, 2011

Stuffed Croissants

Are you looking for a hearty but quick meal?  Well look no further, it's right here.  Tonight while trying to figure out something to make for dinner, I just started adding things to my pan and this is what I got for dinner.
2 rolls of croissant rolls (8 croissants per roll)
1 lb ground turkey (Beef would work)
6 eggs
1 can chili beans (not chili con carne, just chili beans)
1 cup chopped mushrooms
1 cup shredded cheese
Salt & Pepper
Preheat oven to 350 degrees.  Cook turkey until no longer pink.  Add salt and pepper to taste.  Add mushrooms and continue cooking till they are tender.  Add the can of chili beans.  Cook for another five minutes then add your eggs directly to the meat mixture.  Cook until eggs are completely cooked.
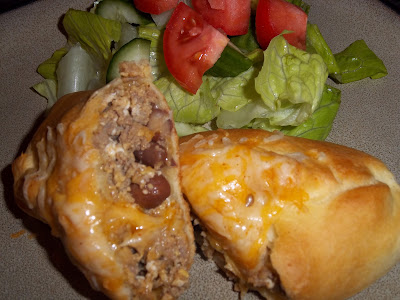
Open croissant package.  Press together two croissant rolls to make the shape of a rectangle.  Be sure to press firmly on the precut line where the croissants would normally separate.  Let the meat cool slightly before adding it to the top of the rolls.  Add a spoonful of the meat mixture to the center of the rectangle.  Also add some shredded cheese.
Bring both side to center and press dough together and on ends to completely close the roll.
Put in oven for 25 minutes.  Pull out and add some cheese to top and cook on broil for an additional 5 minutes.
These would be great stuffed with just about anything you could think of.  I think next time I'll try them with some sort of fruit and maybe a jelly.
I think they would be fantastic with whatever they are stuffed with.

Friday, November 11, 2011

How to get Grease Stains Out of Clothing

How many items of clothing have been tossed into a bucket of rags or taken to a donation site because of grease stains.  I have searched and tried all sorts of laundry items with no luck in removing the stain.
I found an article last week that said I could use chalk?  Really? Chalk?  It stated the chalk absorbed the grease whether the stains was old or new.  I tried it...
I shaved the chalk on the shirt and let it set over night.  I will not identify the site because it did not work.
I kept searching.  Then I found my miracle solution here.
You'll never guess what took out the stain.
Dish soap!
Can you believe it.  If you think about it though, that's the job of our good and trusty dish soap is to soften and loosen the grease and food from our dishes.
Genius..Here are the amazing results.

Here's the sweater after about 1 tbsp of dish soap.  I put it directly on the stain and let it set over night. 
Then I just washed and dried like normal.
Ta Da!!  Amazing!!  Shirts in the future many have a long life.


Tuesday, November 8, 2011

I've Been Featured!!

So exciting to receive an email saying that one of my DIY projects are being featured.
You have to go and check out this amazing new site with all sorts of projects, Road Kill Rescue.
Beckie features bloggers and their DIY projects of stuff that was once headed for the trash
but now has new life and a new purpose.
Go check out her site and get some new ideas.

Apple & Raisin Cookies Attempt #2

So we are still eating cookies from attempt #1, but I could not wait to make batch number two.  We are going to have cookies coming out of our ears, so the first batch is going to work with Shawn.
This is what I tried for this second batch
1 cup softened butter
1 egg
1 tbsp vanilla
8 oz cream cheese
2 tbsp fat free milk
1 cup brown sugar
1/2 tsp cinnamon
1/4 tsp baking soda
1 1/2 cups oatmeal
1 cup coconut
1 cup raisins
2 grated apples
1 cup flour
I combined the softened butter, milk and cream cheese with electric mixer till creamy.  I then added the brown sugar, vanilla, cinnamon and egg.  Mix well.  Next stir in the grated apples, oatmeal, coconut, raisins, flour and baking soda.  Mix together until everything is combined.  Place on cookie sheet by the spoonful and bake in 350 degree oven.  Bake for about thirteen minutes.
These cookies turned about much less "cakey" than the first batch.  These had a more "cookie" like texture.  I'll keep at it though until I get it just right.

My Sweet Bird Picture

I found this darling little bird picture a few days ago at Goodwill.  I love birds.  This is hand painted and numbered.  Not sure it's a known artist, but I just adore this picture.

My Completed Living Room

After a week of hard and intense labor, well maybe not that labor intensive, but definitely thought provoking my living room is complete.  It looks ravishing.  I love it.  I wasn't sure about the color because it is a little less color than I would normally choose.  After several days of living with it though, I have decided I really like it.  I'm still on the hunt for some great fabric with that added color for some more throw pillows, but for now, it's good.  Here are the after shots I've obtained.
So I recovered the couch pillows for $12.78.  To see the before and afters of the couch click here.
I made new valances for the windows.  The fabric and ribbon cost me $4.50.  To see the curtains post go here.
And the paint cost me $7.50 from the Habitat for Humanity Restore.
Grand total $24.78.
Amazing! I love it.
Doesn't it look fantastic!  What do you think?
Stay tuned for my new project...refinishing the side table and coffee table I picked up.