Monday, November 21, 2011

Cranberry Cookies

Cranberry Cookies are a perfect little twist for your holiday treats!
These little babies were fantastic!!  I picked up a bag of fresh cranberries a week ago and have been looking for a recipe.  It seems like many of the recipes out there call for dried cranberries though and not fresh.
But I wanted to cook with fresh cranberries.
I stumbled across this recipe and figured I'd give it a try.  Boy, am I'm glad did.
For a little piece of your heaven click here.
I used real lemon and omitted the walnuts.
I was going to add white chocolate chips but realized I was out of them toward the end.
I will add them next time for sure.
I also only baked for 13 minutes.
These cookies have a bit of tartness and little sugar.  Perfect combination.  And the lemon ties it all together.
Delicious!  Too bad my hubby doesn't like cranberries, because I do not need to eat all of these cookies myself.

Friday, November 18, 2011

Tostadas

You need:
Tostada shells
1 lb lean beef
1 tbsp taco seasoning (recipe found here)
Shredded cheese
1 can black beans
1 can refried beans
tomatoes
Preheat oven to 350 degrees.  The tostada shells I use to not say to cook them but I warm them before topping them.  Cook the beef and then add the black beans, taco seasoning and about 1/2 cup of water.  Cook until all the water is absorbed.  When warming the refried beans I add about 2 tbsp of water to make the beans a little easier to spread on the tostada shell.
To top you shells spread the refried beans, beef mixture, cheese, lettuce and then you tomatoes.  You may top yours with sour cream or salsa.  Or you may add them amazing sauce that my mom use to make.  Click right here for the recipe.
Here are my boys enjoying some yumminess.

Taco Sauce

This is the sauce that my mom use to make to top tacos.  Yum.
1/4 cup fat free mayonnaise
3 tbsp salsa
1/2 tsp garlic salt
2 tbsp ketchup
Pepper
Mix all ingredients together.  Top burritos, tacos or your tostadas.  Yummy!

Boneless Pork Lions & Veggie Salad

For the pork loins...
2 tbsp flour
2 tbsp olive oil
1/4 cup Italian bread crumbs
1/2 tsp garlic salt
1/2 tsp dill
1/4 tsp cumin
Mix all ingredients in a bowl.  Warm up olive oil in a pan.  Swirl oil in pan to make sure it completely coats the bottom.  Completely coat pork loins in mixture.  Add to pan and cover with lid for about 7 minutes on the first side and 4 minutes for each additional side.  Cook until juices ran clear.
For the veggie salad...
3 small tomatoes
2 zucchini
1/2 small purple onion
1 clove diced garlic
2 tbsp olive oil
1/2 tsp dill
Salt & Pepper
Warm olive oil and add garlic.  Cook over medium for about a minute.  Add the onions and the zucchini and cook until tender.  The last minute or so of cooking add the tomatoes and dill.  Turn down the heat to low.  Salt and pepper salad to taste.

Saturday, November 12, 2011

Stuffed Croissants

Are you looking for a hearty but quick meal?  Well look no further, it's right here.  Tonight while trying to figure out something to make for dinner, I just started adding things to my pan and this is what I got for dinner.
2 rolls of croissant rolls (8 croissants per roll)
1 lb ground turkey (Beef would work)
6 eggs
1 can chili beans (not chili con carne, just chili beans)
1 cup chopped mushrooms
1 cup shredded cheese
Salt & Pepper
Preheat oven to 350 degrees.  Cook turkey until no longer pink.  Add salt and pepper to taste.  Add mushrooms and continue cooking till they are tender.  Add the can of chili beans.  Cook for another five minutes then add your eggs directly to the meat mixture.  Cook until eggs are completely cooked.
Open croissant package.  Press together two croissant rolls to make the shape of a rectangle.  Be sure to press firmly on the precut line where the croissants would normally separate.  Let the meat cool slightly before adding it to the top of the rolls.  Add a spoonful of the meat mixture to the center of the rectangle.  Also add some shredded cheese.
Bring both side to center and press dough together and on ends to completely close the roll.
Put in oven for 25 minutes.  Pull out and add some cheese to top and cook on broil for an additional 5 minutes.
These would be great stuffed with just about anything you could think of.  I think next time I'll try them with some sort of fruit and maybe a jelly.
I think they would be fantastic with whatever they are stuffed with.

Friday, November 11, 2011

How to get Grease Stains Out of Clothing

How many items of clothing have been tossed into a bucket of rags or taken to a donation site because of grease stains.  I have searched and tried all sorts of laundry items with no luck in removing the stain.
I found an article last week that said I could use chalk?  Really? Chalk?  It stated the chalk absorbed the grease whether the stains was old or new.  I tried it...
I shaved the chalk on the shirt and let it set over night.  I will not identify the site because it did not work.
I kept searching.  Then I found my miracle solution here.
You'll never guess what took out the stain.
Dish soap!
Can you believe it.  If you think about it though, that's the job of our good and trusty dish soap is to soften and loosen the grease and food from our dishes.
Genius..Here are the amazing results.

Here's the sweater after about 1 tbsp of dish soap.  I put it directly on the stain and let it set over night. 
Then I just washed and dried like normal.
Ta Da!!  Amazing!!  Shirts in the future many have a long life.


Tuesday, November 8, 2011

I've Been Featured!!

So exciting to receive an email saying that one of my DIY projects are being featured.
You have to go and check out this amazing new site with all sorts of projects, Road Kill Rescue.
Beckie features bloggers and their DIY projects of stuff that was once headed for the trash
but now has new life and a new purpose.
Go check out her site and get some new ideas.

Apple & Raisin Cookies Attempt #2

So we are still eating cookies from attempt #1, but I could not wait to make batch number two.  We are going to have cookies coming out of our ears, so the first batch is going to work with Shawn.
This is what I tried for this second batch
1 cup softened butter
1 egg
1 tbsp vanilla
8 oz cream cheese
2 tbsp fat free milk
1 cup brown sugar
1/2 tsp cinnamon
1/4 tsp baking soda
1 1/2 cups oatmeal
1 cup coconut
1 cup raisins
2 grated apples
1 cup flour
I combined the softened butter, milk and cream cheese with electric mixer till creamy.  I then added the brown sugar, vanilla, cinnamon and egg.  Mix well.  Next stir in the grated apples, oatmeal, coconut, raisins, flour and baking soda.  Mix together until everything is combined.  Place on cookie sheet by the spoonful and bake in 350 degree oven.  Bake for about thirteen minutes.
These cookies turned about much less "cakey" than the first batch.  These had a more "cookie" like texture.  I'll keep at it though until I get it just right.

My Sweet Bird Picture

I found this darling little bird picture a few days ago at Goodwill.  I love birds.  This is hand painted and numbered.  Not sure it's a known artist, but I just adore this picture.

My Completed Living Room

After a week of hard and intense labor, well maybe not that labor intensive, but definitely thought provoking my living room is complete.  It looks ravishing.  I love it.  I wasn't sure about the color because it is a little less color than I would normally choose.  After several days of living with it though, I have decided I really like it.  I'm still on the hunt for some great fabric with that added color for some more throw pillows, but for now, it's good.  Here are the after shots I've obtained.
So I recovered the couch pillows for $12.78.  To see the before and afters of the couch click here.
I made new valances for the windows.  The fabric and ribbon cost me $4.50.  To see the curtains post go here.
And the paint cost me $7.50 from the Habitat for Humanity Restore.
Grand total $24.78.
Amazing! I love it.
Doesn't it look fantastic!  What do you think?
Stay tuned for my new project...refinishing the side table and coffee table I picked up. 

Sunday, November 6, 2011

Bean & Cheese Chimichanga & Spanish Rice

6 flour tortillas
1 can refried beans
1 1/2 cups any kind of shredded cheese
3 tbsp olive oil
Heat up the refried beans.  Once heated put beans and cheese closer to one side of the tortilla like so
Fold one side over the beans.
Fold in both sides.
And roll.
Next warm the 3 tbsp of olive oil in skillet on medium.  When oil is hot place rolled chimis open side down.  Heat on each side for about 3 to 4 minutes, or until golden brown.
You could also add seasoned meat to the chimichanga.  For a recipe for seasoned meat go here.
My next feat will be to make my own refried beans.  We eat so many beans in our home I might as well start soaking, cooking and freezing my own.
The Spanish rice idea came from a friends blog.  I loved her idea of browning the rice before cooking it.  It reminds me of my all time favorite Rice A Roni.  While Shawn and I were dating I lived on Rice A Roni.
Here's how I cooked my Spanish rice.
1 1/2 cups white rice
3 cups water
1 tbsp oregano
1/2 tsp salt
ground pepper
1 can diced tomatoes, drained
1 can of corn, drained
2 tbsp olive oil
Add the olive oil to a skillet over medium heat.  Add rice.  Continue cooking rice and stirring until it reaches a golden brown.
Once a golden brown add the water, oregano, salt and pepper, corn and tomatoes.  Stir and cover until all water is absorbed.  About 20 minutes.
Rice can be added to the chimichanga or eaten as a side dish.  Also if you wanted to spice things up a bit you could add some diced peppers to the rice.

Apple & Raisin Cookies Attempt #1

Although I love making up recipes for dinners and such, I have never had the guts to attempt a sweet treat.  As I went looking today for a recipe that included apples in cookies I came up ended handed, and thus led me to my experimental mode.  I must say, I'm quite pleased with the results I've achieved for my very first cookie recipe.  I'm not a huge fan of "cakey" cookies, but they were pretty good so I decided to share this recipe.  I will continue experimenting with this recipe and make adjustments accordingly.  My first change will be to add one less egg and add less baking soda.  I'll keep you updated. 
1/2 cup softened butter
2 tsp vanilla
8 oz softened neufchatel cheese (similar to cream cheese)
2 eggs
2 apples peeled and shredded in the Cuisinart
1 cup oatmeal
1 cup raisins
2 cups flour
1/2 tsp orange peel
1/2 tsp cinnamon
1/2 tsp baking soda
1 cup coconut
1 cup dark brown sugar
In mixing bowl combine butter, cream cheese, vanilla and dark brown sugar.  Once completely mixed add the eggs.  Next add the shredded apples, raisins and coconut.  In separate bowl combine flour, baking soda, orange peel, cinnamon, and oatmeal.  Cook in an oven set at 350 degrees for about 12 minutes.

Saturday, November 5, 2011

New Curtains

My living room has been a work in progress since I have been out of school.  A few days ago I made new pillows for my couch.  To see that transformation you can go here.  So today I painted the living room.  The fam and I went to the Restore and found a half full 5 gallon bucket of a very pretty and neutral paint color.  It was only $7.50.  Awesome!!  I love that place.  Now that the walls are painted I decided I could show you my beautiful curtains I've been making.  I found enough fabric to make 5 valances.  Here's all the fabric I got...
The fabric on the far left is a very soft grey.  That is what I used for the curtains.  That's the only that cost $2.50.  The middle fabric is an upholstery fabric.  I made a pillow with that one.  That cost $0.40.  And the fabric on the far right is a sheer silver fabric.  I'm thinking of making a gathered pillow.  Yea, you'll just have to see how that one turns out because I'm not sure how to explain what I'm envisioning.
Didn't they turn out nice?!  They were a little plain with just the grey so I put on a cute piece of ribbon to spice them up a bit.  The ribbon was only $1.00 a spool. 
Right now in these pictures it looks a little bland.  I'm just going to give it some time.  I'll know when I see that piece of art for the wall or fabric for the couch.  I will keep you posted.

Roasted Chicken & Homemade Stuffing

2 cups water
2 chicken bouillon cubes
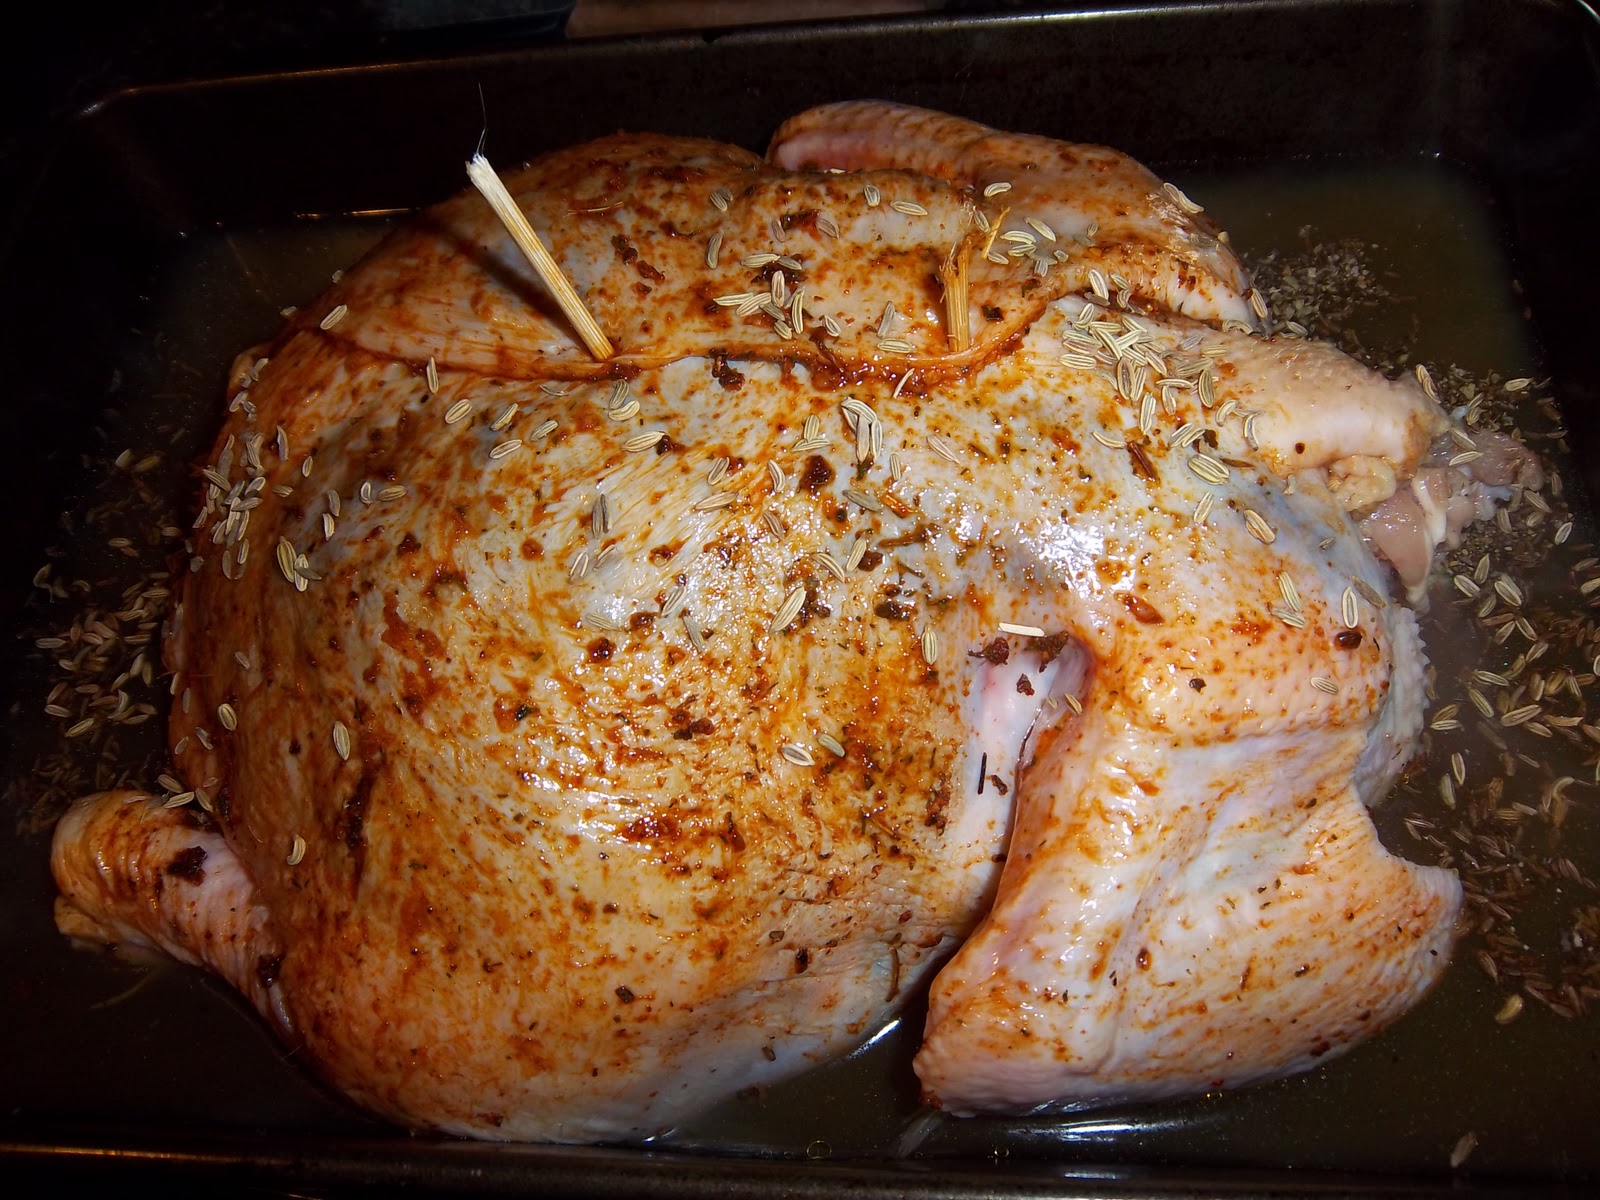
1 tbsp paprika
1 tsp garlic salt
1 tsp basil
1 tbsp caraway
1 tbsp fennel seeds
Preheat oven to 350.  First I rinsed the chicken with cool water and placed in a dish breast side down.  Next I cut the bottom on the chicken skin and folded over the sides.  I mixed the dry ingredient's above in a bowl and then rubbed it on the chicken and placed kabob stinks in the chicken to hold the skin back in place.  Next boil two cups of water and added the bouillon cubes.  Once the cubes were dissolved I added it to the bottom of the baking dish.  Next add the caraway seeds and fennel seeds to top of chicken and in water.
Place in oven for 1 hr 15 mins.  When the timer goes off, take out of oven and bast with liquid in bottom of dish.  When basting put the liquid under the skin that you cut before you placed it in the oven.
I don't have a meat thermometer, I know insane, so I have to slice the chicken to verify that the meat is no longer pink and the juices run clear.  I cooked this baby for about two hours.  Before I carved it I let it sit about 20 minutes and let the juices redistribute.
Now for this amazing stuffing...After getting the chicken in the oven I recruited my little helper to tear the fresh bread.  He did a fantastic job!!
You'll need:
4 multi grain dinner rolls
4 large white rolls
1 cup diced celery
1 cup diced carrots
2 cups finely chopped kale
1/2 cup mushrooms
1 tbsp rosemary
1 tsp garlic salt
1 tsp dill
1 tsp thyme
4 tbsp olive oil divided
Tear bread into bite size pieces.  Once all bread is torn, place in large plastic bag (I reused the one that the rolls came in) drizzle 2 tbsp olive oil in the bag, the garlic salt and the dill.  Shake bag like crazy to evenly coat.  Next place all the bread on a cookie sheet and place in the already heated oven with the chicken for 15 minutes.
These toasted bread crumbs were so good I could have just eaten these with some olive oil and balsamic.  Yea, they were that good.  But don't eat them all, we need some for our stuffing.  If my sister was here she would have eaten the whole pan.  She loves bread.
 While these cool, get the other 2 tbsp of olive oil heated on the stove and add the celery, carrots, kale, mushrooms, rosemary and thyme.  Cook over medium heat until tender.  Set aside till the chicken is done.
Doesn't this look amazing!  It smelled even better with the rosemary and thyme.
When the chicken is done cooking, set aside but remove the water that was put in before and place in measuring cup.
You're putting it back in the measuring cup because you need 2 cups.  Of course, some of it while cooking evaporates.  So measure what is left and add water to equal your 2 cups.  Only 1/4 of a cup evaporated,from mine.  Add the liquid to a large pan on medium heat.  Add the vegetable mixture.  Once it starts boiling, take off heat and add the toasted bread. Stir until all the liquid is absorbed and all bread has been added.  Cover with lid and let sit while you carve the chicken.
Amazing...Enjoy!!

Friday, November 4, 2011

New Pillows for the Couch

For the last several months I have been telling Shawn that I wanted to find fabric to cover the couch pillows and give them sort of a face lift.  We've had our sofa for about three years and it was handed down from Shawn's dad when we received it, so it is in no way a new couch, but it's still a good couch.  It just looks a little run down.  I thought some material would do the trick and my goodness has it.  Here are the before pictures of the couch...
And here are the after pictures...
 

Don't they look amazing.  I love them!  Are you ready for the best part?  I found almost an entire roll of fabric for only $12.38 at Goodwill. 
The material was also reversible.  Isn't it so pretty.  I'm very happy with how the pillows turned out.  I'm trying to incorporate some red into the couch but have not found the right fabric yet.  The other black and white fabric I got at The Salvation Army for $0.40.  I just recovered another throw pillow I already had.  So I'm still searching for something in red to break up the black and white.  For now though....I love the transformation.
Of course with new pillows now makes it necessary for a new paint color on the wall and new curtains.  Yea, more projects.

Tuesday, November 1, 2011

Happy Halloween

My sweet little vintage boyscout from the 60's.  Shawn had a client awhile back that was boyscout.  This was his uniform when he was a scout.  The gentleman was not sure what to do with the uniforms, so he gave them to Noah.  Noah loves playing dress up, and they fit him perfectly.
Yes, that would be my child in the center winking at the camera. 
I love that boy!